> ## Documentation Index
> Fetch the complete documentation index at: https://private-7c7dfe99-mintlify-fbfa8bee.mintlify.site/llms.txt
> Use this file to discover all available pages before exploring further.

# SCIM provisioning with Okta

> How to set up SCIM provisioning between Okta and ClickHouse Cloud

export const PrivatePreviewBadge = () => {
  return <div className="privatePreviewBadge">
            <div className="privatePreviewIcon">
            <svg width="16" height="16" viewBox="0 0 16 16" fill="none" xmlns="http://www.w3.org/2000/svg">
                <path d="M5.33301 6.66667V4.66667V4.66667C5.33301 3.194 6.52701 2 7.99967 2V2C9.47234 2 10.6663 3.194 10.6663 4.66667V4.66667V6.66667" stroke="currentColor" strokeLinecap="round" strokeLinejoin="round" />
                <path d="M8.00033 9.33337V11.3334" stroke="currentColor" strokeLinecap="round" strokeLinejoin="round" />
                <path fillRule="evenodd" clipRule="evenodd" d="M11.333 14H4.66634C3.92967 14 3.33301 13.4033 3.33301 12.6666V7.99996C3.33301 7.26329 3.92967 6.66663 4.66634 6.66663H11.333C12.0697 6.66663 12.6663 7.26329 12.6663 7.99996V12.6666C12.6663 13.4033 12.0697 14 11.333 14Z" stroke="currentColor" strokeLinecap="round" strokeLinejoin="round" />
            </svg>
        </div>
            {'Private preview in ClickHouse Cloud'}
        </div>;
};

export const EnterprisePlanFeatureBadge = ({feature = 'This feature', support = false, linking_verb_are = false}) => {
  return <div className="enterprisePlanFeatureContainer">
            <div className="enterprisePlanFeatureBadge">
                Enterprise plan feature
            </div>
            <div>
                <p>{feature} {linking_verb_are ? 'are' : 'is'} available in the Enterprise plan. {support ? `Contact support to enable this feature.` : 'To upgrade, visit the plans page in the cloud console.'}</p>
            </div>
        </div>;
};

<Note>
  SCIM provisioning is in private preview.
</Note>

ClickHouse Cloud supports SCIM 2.0 (System for Cross-domain Identity Management) for automated user and group lifecycle management. Once connected to your identity provider, every user you assign to the ClickHouse Cloud application is automatically created in your organization with the right role, profile updates flow through automatically, and removing a user from your IdP removes their access — no manual invites, no orphaned accounts.

This guide walks through setting up SCIM provisioning end-to-end with **Okta**. The ClickHouse Cloud SCIM endpoint follows SCIM 2.0 (RFC 7644), but authentication is supported only via Basic Auth, and Okta is the only identity provider we've tested against. Other SCIM 2.0 IdPs may work if they can authenticate using Basic Auth, but they're not officially supported today.

<h2 id="before-you-begin">
  Before you begin
</h2>

You'll need:

* The **Admin** role in your ClickHouse Cloud organization.
* [SAML SSO](/products/cloud/guides/security/cloud-access-management/saml-sso-setup) already configured between your IdP and ClickHouse Cloud. SCIM creates the user accounts; those accounts sign in through SAML, so SSO must be working first.
* Super-admin access to your Okta tenant, with permission to install applications and configure provisioning.
* A list of the roles you want to assign through SCIM (for example: Admins, Developers, Read-only). Decide this up front — you'll create matching groups in Okta.

<h2 id="how-scim-works">
  How SCIM works with ClickHouse Cloud
</h2>

1. An admin in Okta assigns a user — directly or through a group — to the ClickHouse Cloud application.
2. Okta calls the ClickHouse Cloud SCIM endpoint over HTTPS, authenticated with a token you generate.
3. ClickHouse Cloud creates the user in your organization and assigns roles based on Okta group membership.
4. The user signs in to ClickHouse Cloud through your existing SAML SSO flow.
5. Profile changes, group changes, and deactivation in Okta propagate to ClickHouse Cloud automatically.

<h2 id="configure-clickhouse-cloud">
  Configure SCIM on your ClickHouse Cloud organization
</h2>

<Steps>
  <Step>
    <h3 id="enable-scim-provisioning">
      Enable SCIM
    </h3>

    Sign in to **ClickHouse Cloud Console** as an organization admin and open **Organization settings → SAML and SCIM settings → SCIM Configuration**.
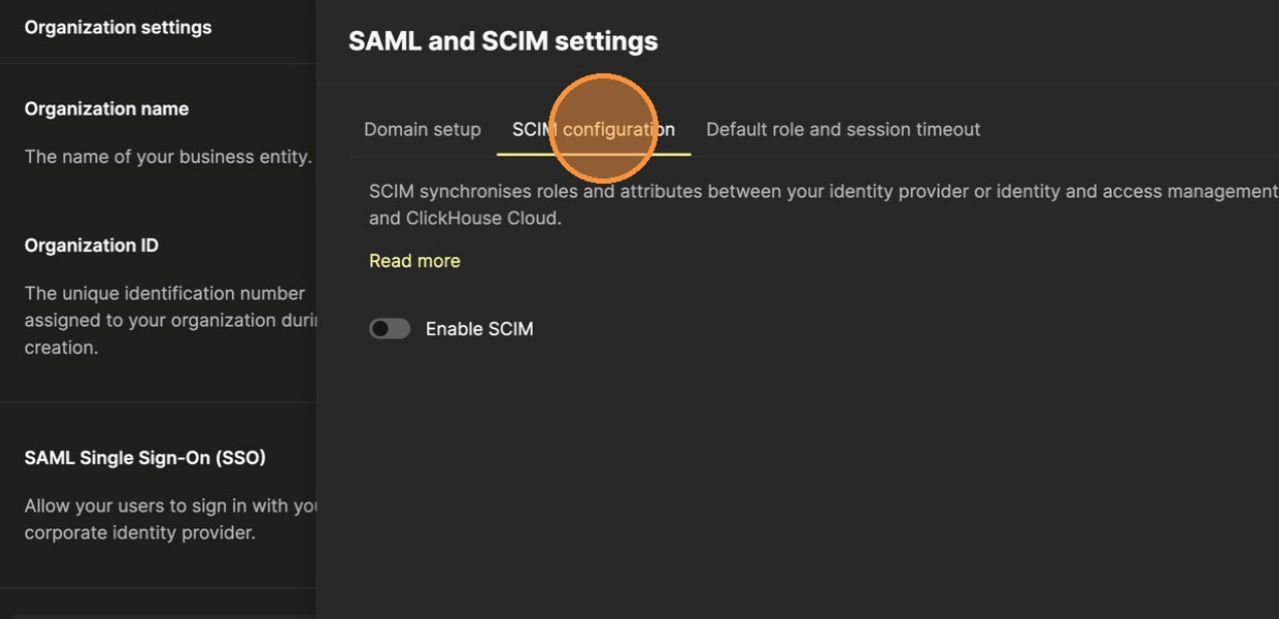
    <img src="https://mintcdn.com/private-7c7dfe99-mintlify-fbfa8bee/YtLHbpLqKXQpx3d8/images/cloud/security/scim-okta/scim-okta-01.png?fit=max&auto=format&n=YtLHbpLqKXQpx3d8&q=85&s=b25510911007fa8527cdaedda985afae" alt="Navigate to the SCIM configuration tab in Organization settings" width="1279" height="619" data-path="images/cloud/security/scim-okta/scim-okta-01.png" />

    Click `Enable SCIM`. SCIM is unlocked once SAML SSO is connected — if the option is greyed out, finish your SAML setup first.
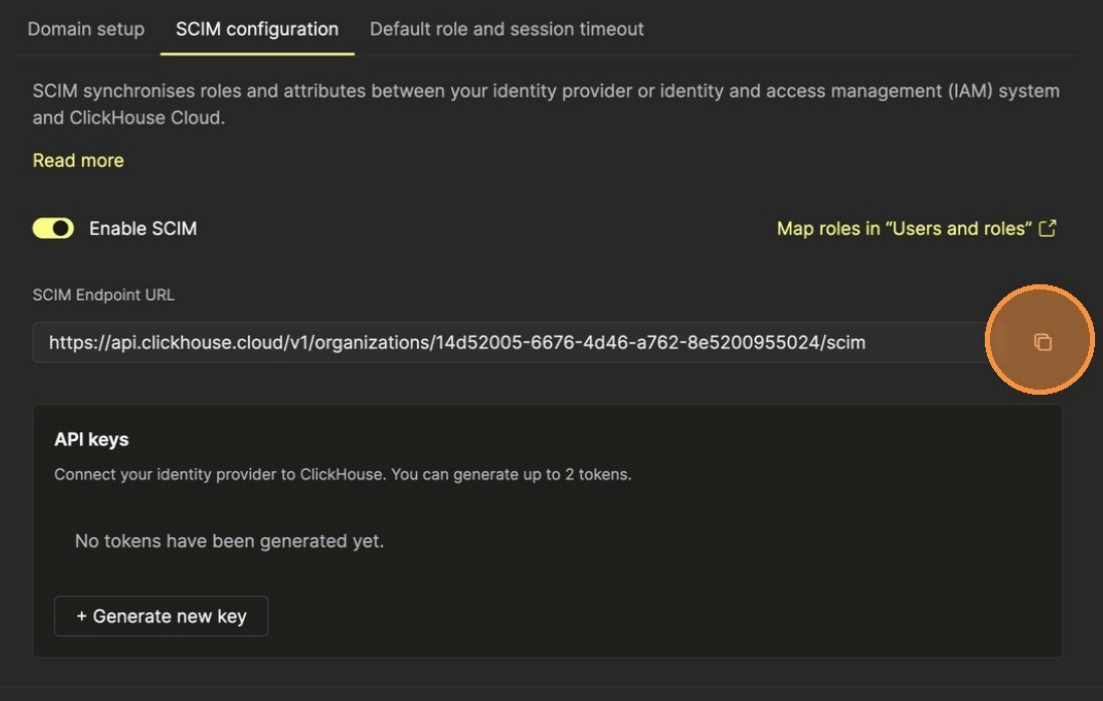
    <img src="https://mintcdn.com/private-7c7dfe99-mintlify-fbfa8bee/YtLHbpLqKXQpx3d8/images/cloud/security/scim-okta/scim-okta-02.png?fit=max&auto=format&n=YtLHbpLqKXQpx3d8&q=85&s=8670932b9bfef7bd68987e63e516900e" alt="Toggle Enable SCIM" width="1103" height="701" data-path="images/cloud/security/scim-okta/scim-okta-02.png" />

    A **SCIM endpoint URL** is generated, in the form:

    ```plaintext theme={null}
    https://api.clickhouse.cloud/v1/organizations/<your-org-id>/scim
    ```

    Copy it — you'll paste it into Okta later.
  </Step>

  <Step>
    <h3 id="generate-scim-token">
      Generate a SCIM access token
    </h3>

    Locate the `Create an API key` section and choose an expiration date.
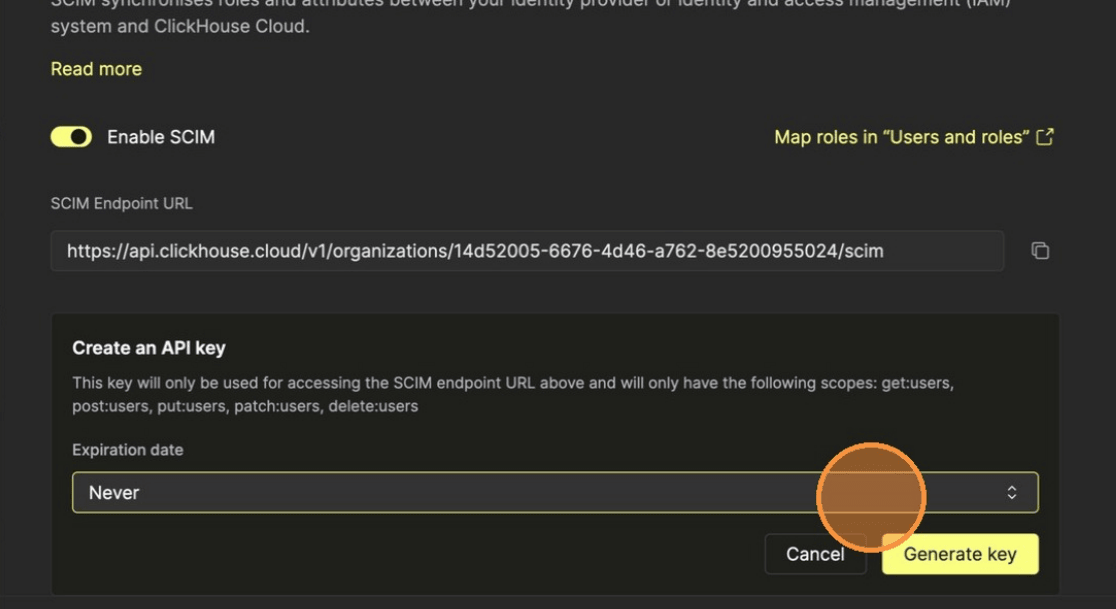
    <Tip>
      **Plan for rotation**

      We recommend setting an expiry of 12 months and adding a calendar reminder. ClickHouse Cloud supports up to two active SCIM tokens at once so you can rotate without downtime: generate the new token, swap Okta over, confirm provisioning still works, then revoke the old token.
    </Tip>

    Click `Generate key`. The token is shown **once**, as a key (prefixed `scim_`) and a secret. Copy both immediately and store them in a secure secrets manager — they can't be retrieved later. If you lose them, revoke the token and generate a new one.

    <img src="https://mintcdn.com/private-7c7dfe99-mintlify-fbfa8bee/YtLHbpLqKXQpx3d8/images/cloud/security/scim-okta/scim-okta-07.png?fit=max&auto=format&n=YtLHbpLqKXQpx3d8&q=85&s=3888b8c934d2db786bff610b2686e084" alt="Generate a new SCIM API key" width="1116" height="609" data-path="images/cloud/security/scim-okta/scim-okta-07.png" />
  </Step>

  <Step>
    <h3 id="define-role-mapping">
      Define the role mapping
    </h3>

    From the SCIM Configuration panel, click **Map roles in "Users and roles"** (or navigate directly via **Users and roles → Roles**).

    SCIM groups bind to ClickHouse Cloud roles by name, with a few rules to keep in mind:

    * **You can't map a SCIM group to a predefined system role.** SCIM mappings apply only to custom roles. If you need to expose a system-level capability through SCIM, create a custom role that wraps the permissions you want.
    * **Matching names auto-link.** If a custom role has the same name as the incoming SCIM group, ClickHouse Cloud links them automatically — no manual mapping needed.
    * **To use a different role name than the group name**, create the custom role with the role name you want, then set its **SCIM group** field to the name of the SCIM group it should bind to.
    * **Unmapped groups create new roles.** If Okta pushes a group that doesn't match an existing role name and isn't referenced by any role's `SCIM group` field, ClickHouse Cloud creates a new custom role with that group's name. You can then grant it the permissions you want.
  </Step>
</Steps>

<h2 id="configure-okta">
  Configure the ClickHouse Cloud application in Okta
</h2>

<Steps>
  <Step>
    <h3 id="open-clickhouse-cloud-app">
      Open your ClickHouse Cloud application in Okta
    </h3>

    In the **Okta Admin Console**, go to **Applications → Applications** and search for the application you created when you set up SAML SSO for ClickHouse Cloud. Open it.

    If you haven't created the SAML application yet, follow the [SAML SSO setup guide](/products/cloud/guides/security/cloud-access-management/saml-sso-setup) first — SCIM provisioning is configured on the same application.

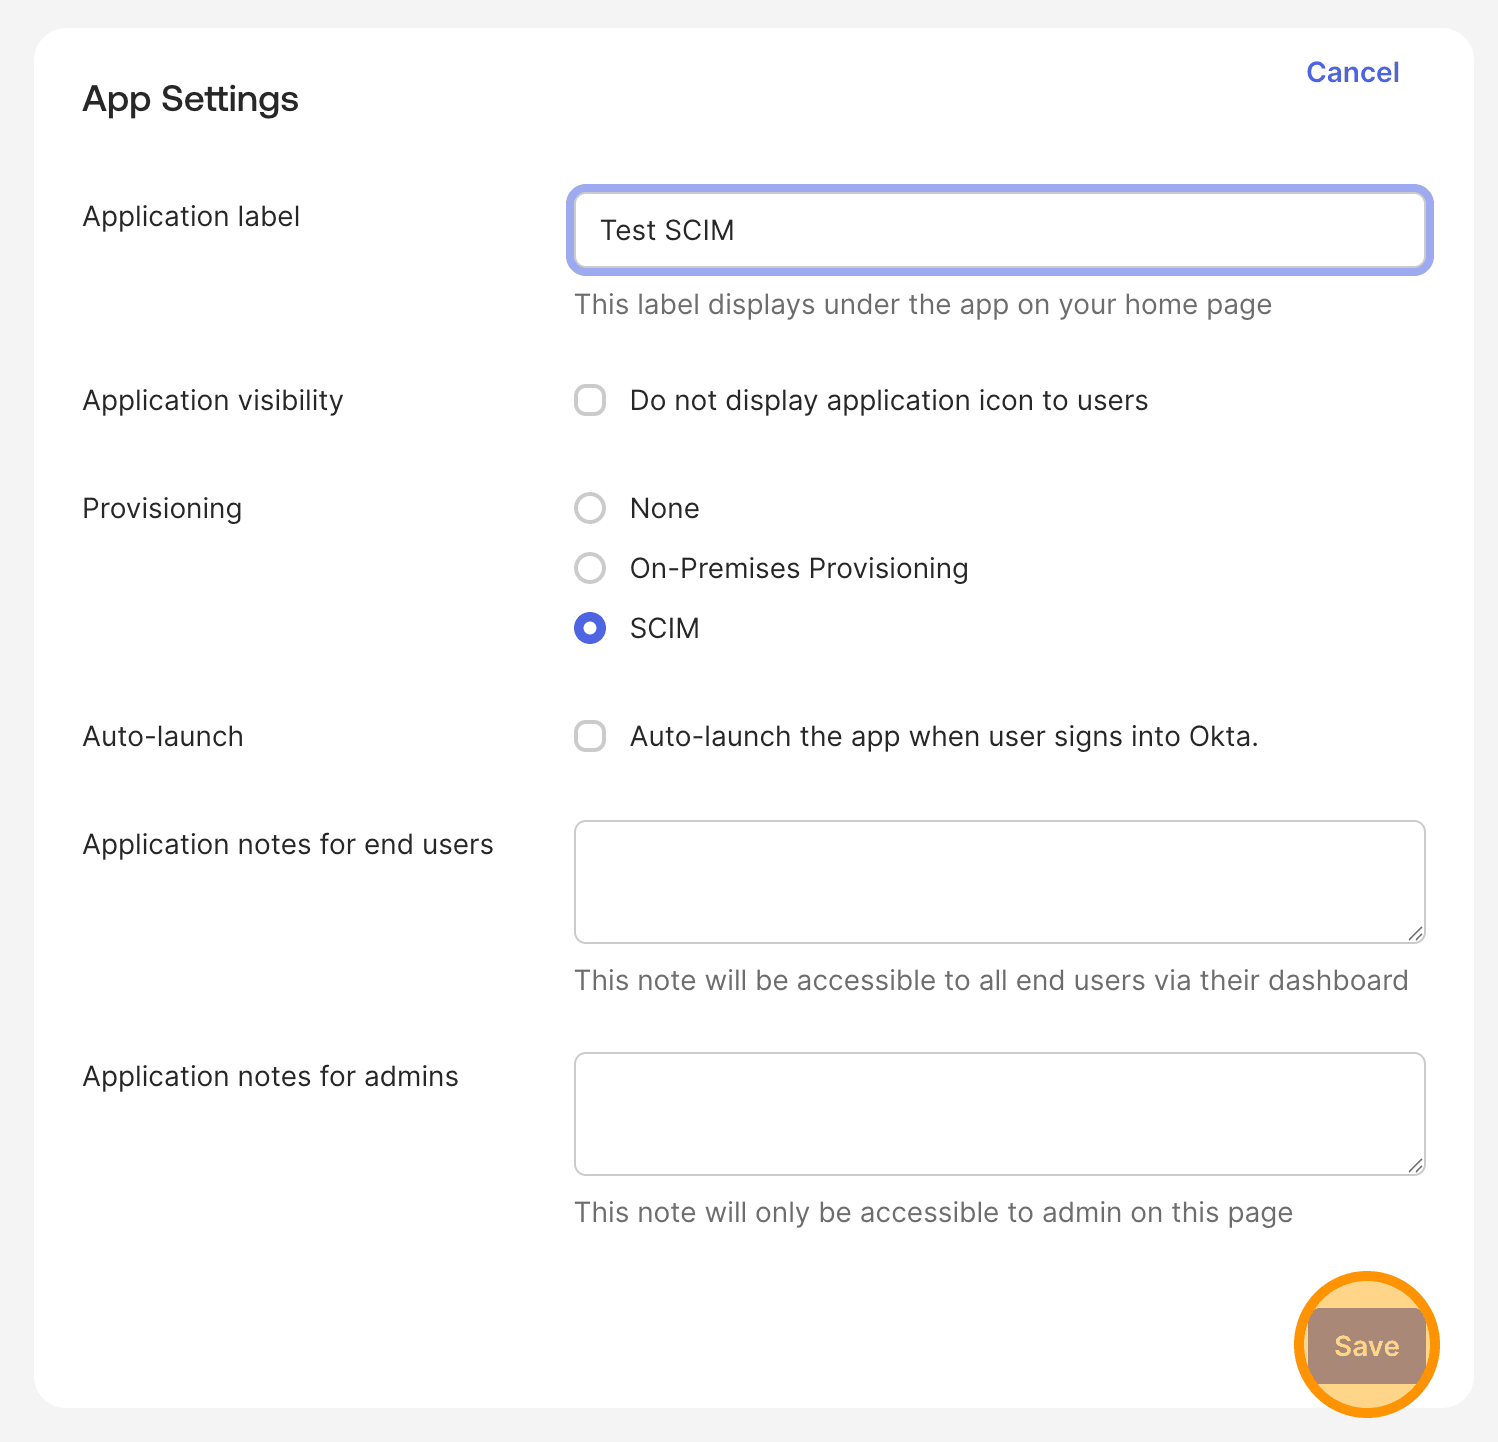
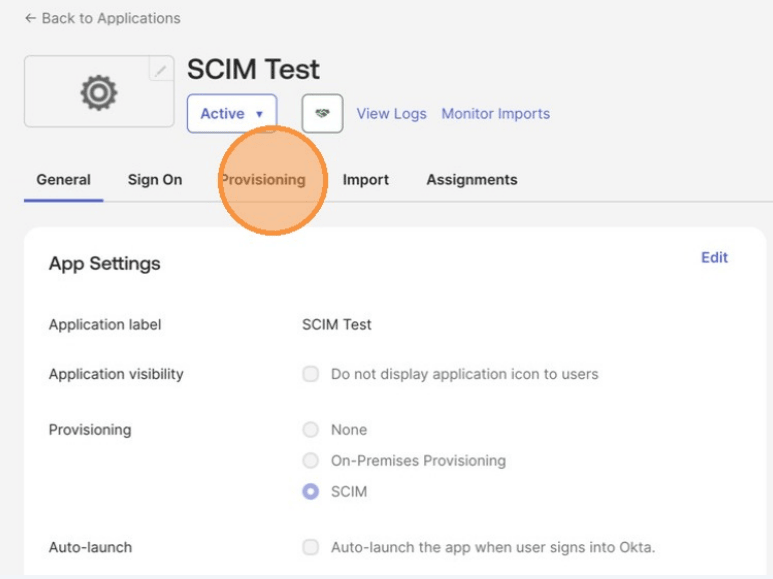
    On the **General** tab, find the **App Settings** section and click `Edit`. Under **Provisioning**, select `SCIM`, then click `Save`.

    <img src="https://mintcdn.com/private-7c7dfe99-mintlify-fbfa8bee/YtLHbpLqKXQpx3d8/images/cloud/security/scim-okta/scim-okta-03.png?fit=max&auto=format&n=YtLHbpLqKXQpx3d8&q=85&s=b9bdaab17ea80ec777ecf3ae98165b85" alt="Set provisioning mode to SCIM in the Okta application settings" width="1498" height="1442" data-path="images/cloud/security/scim-okta/scim-okta-03.png" />

    The application now shows a **Provisioning** tab.
    <img src="https://mintcdn.com/private-7c7dfe99-mintlify-fbfa8bee/YtLHbpLqKXQpx3d8/images/cloud/security/scim-okta/scim-okta-05.png?fit=max&auto=format&n=YtLHbpLqKXQpx3d8&q=85&s=eb743a842be98b54033a3ea21a4b5f90" alt="Provisioning tab now appears on the application" width="773" height="579" data-path="images/cloud/security/scim-okta/scim-okta-05.png" />
  </Step>

  <Step>
    <h3 id="connect-okta-scim">
      Connect Okta to the SCIM endpoint
    </h3>

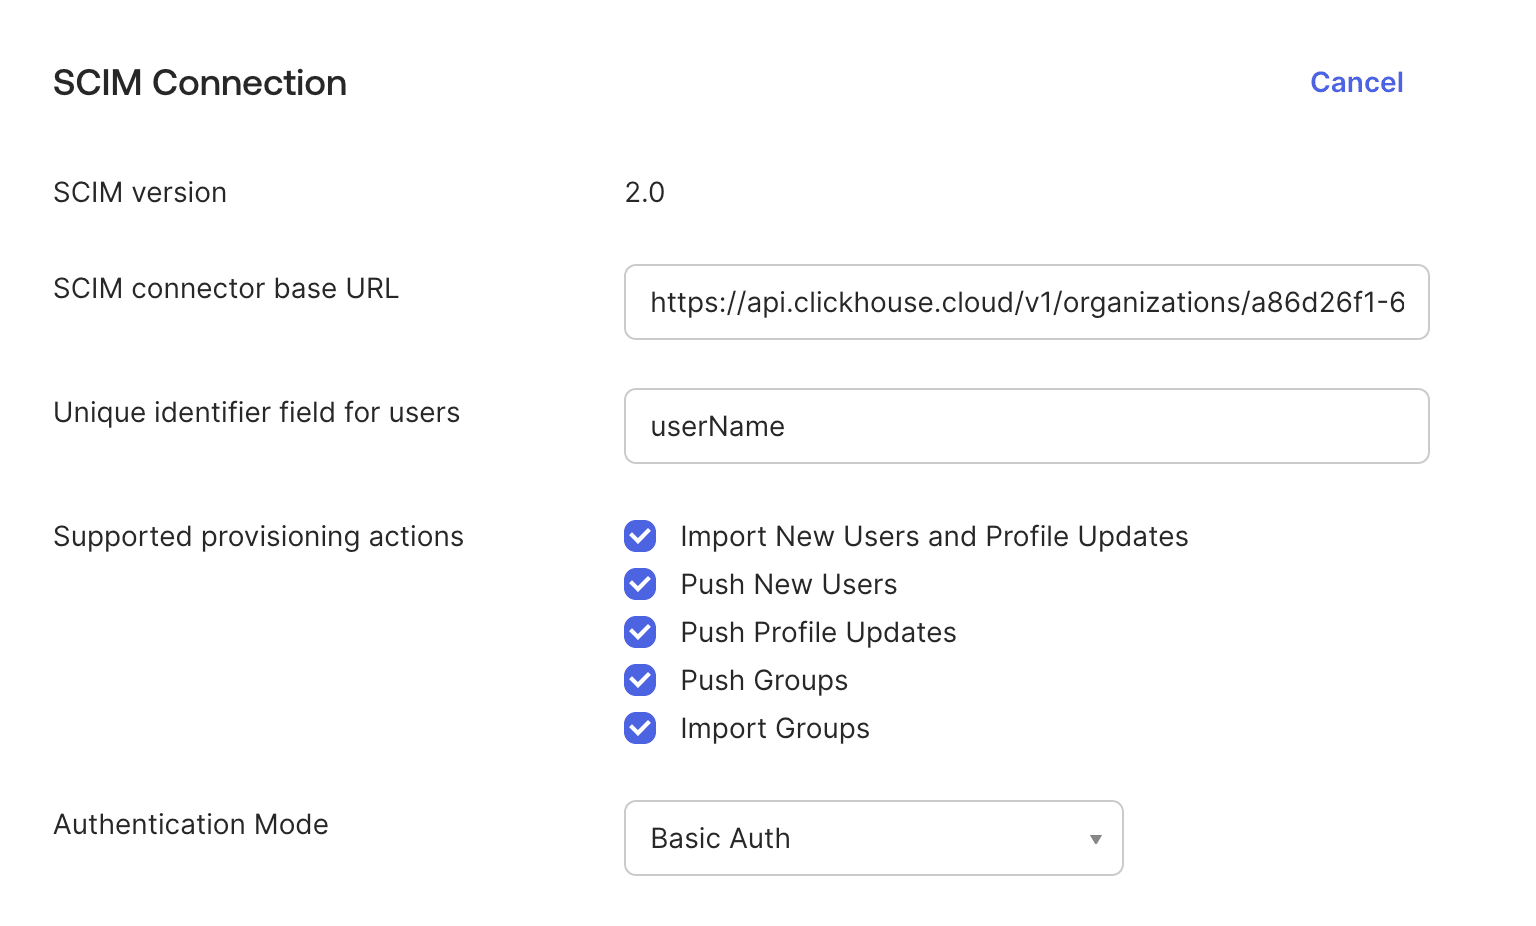
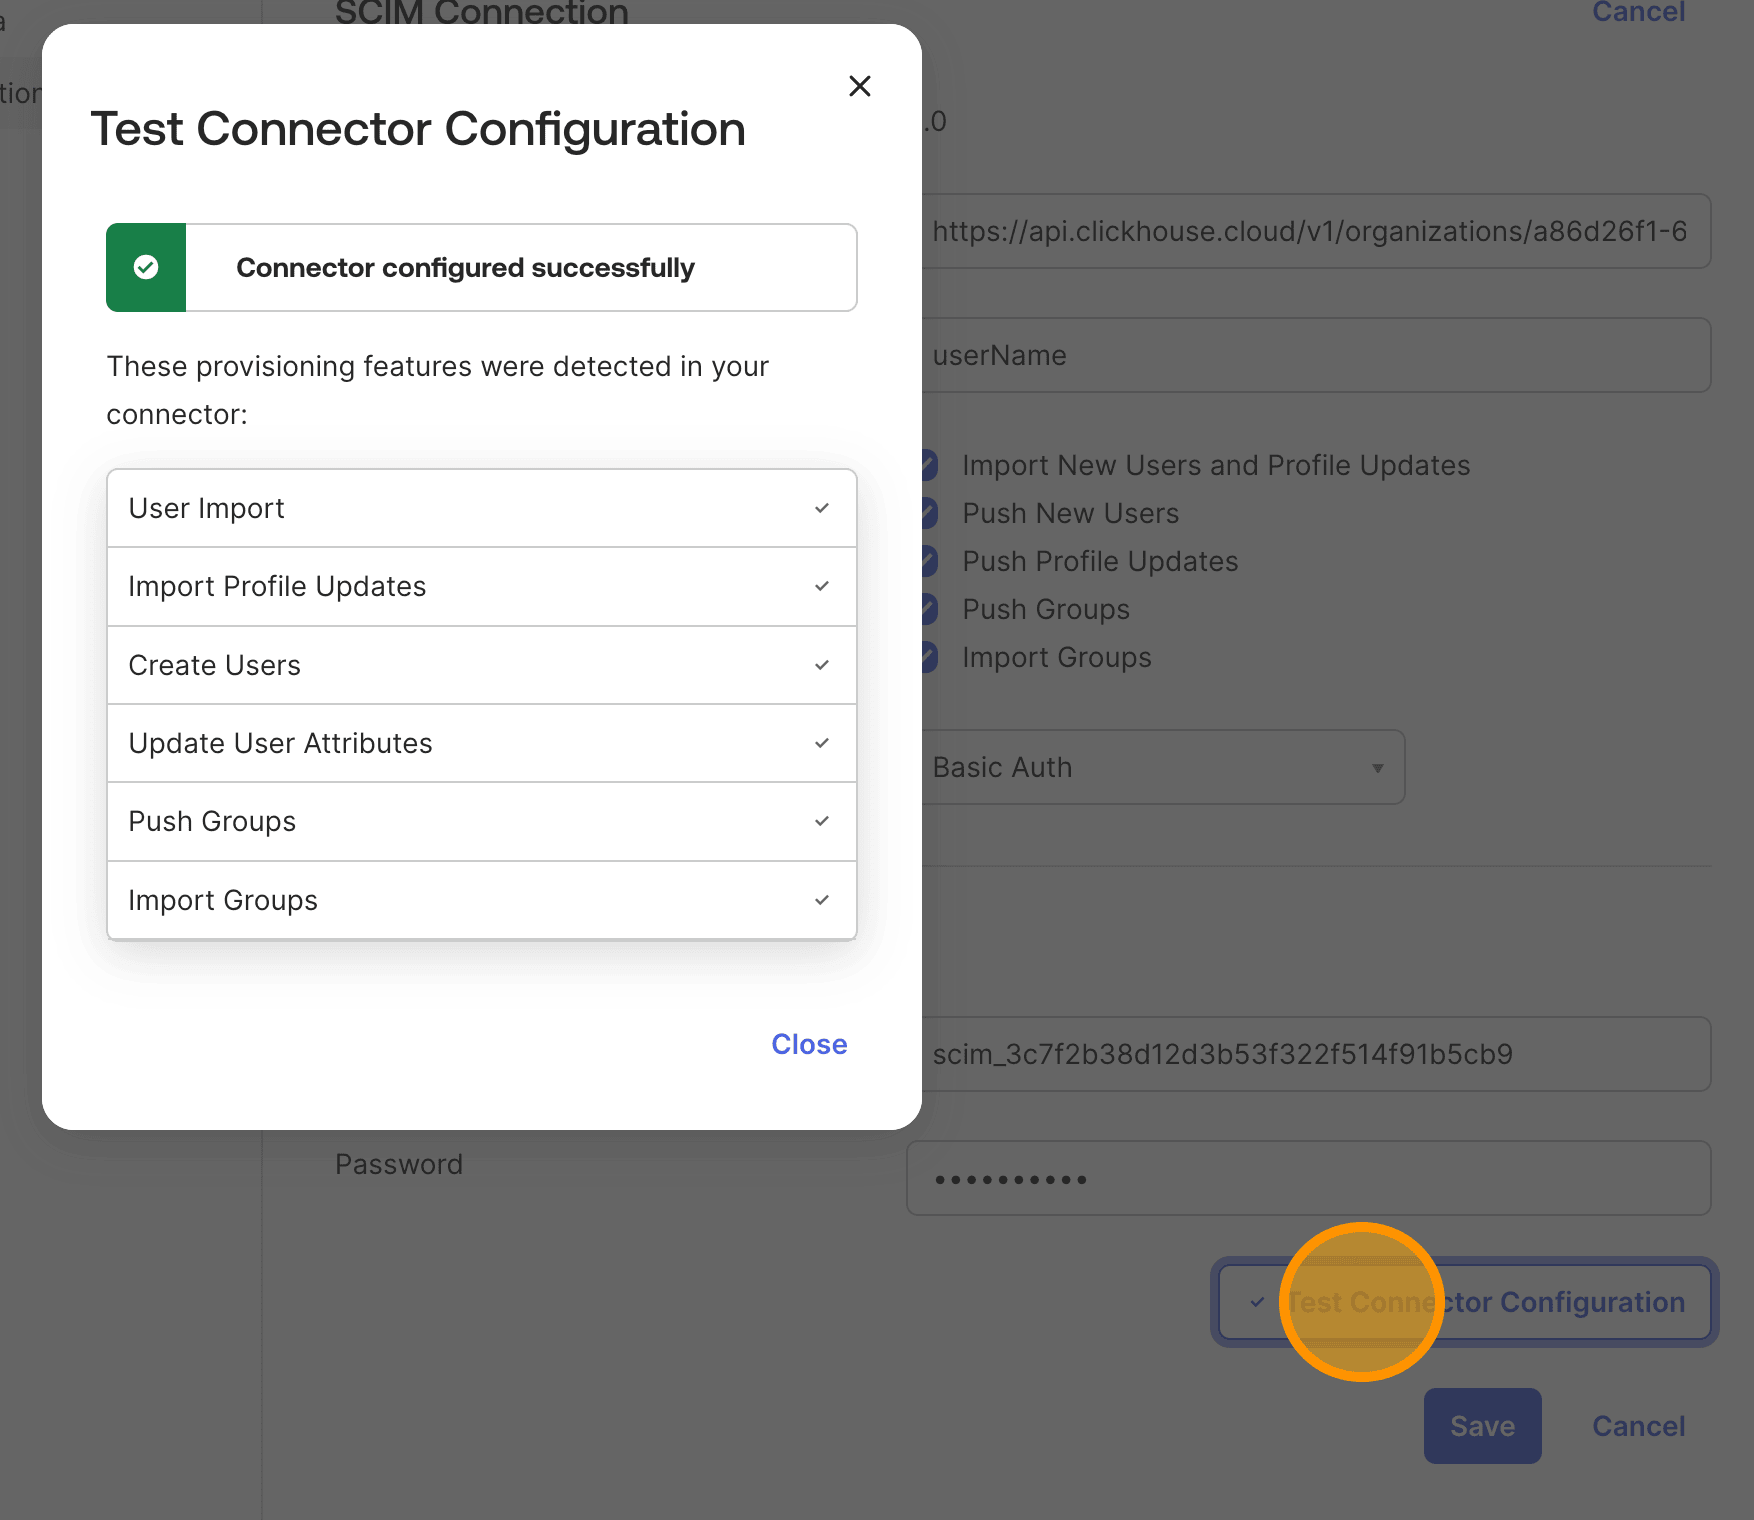
    Open the **Provisioning** tab of the application and click `Edit`. Fill in the form:

    * **SCIM connector base URL** — the SCIM endpoint URL from earlier.
    * **Unique identifier field for users** — `userName`.
    * **Supported provisioning actions** — select all of the following:
      * Import New Users and Profile Updates
      * Push New Users
      * Push Profile Updates
      * Push Groups
      * Import Groups
    * **Authentication Mode** — `Basic Auth`.
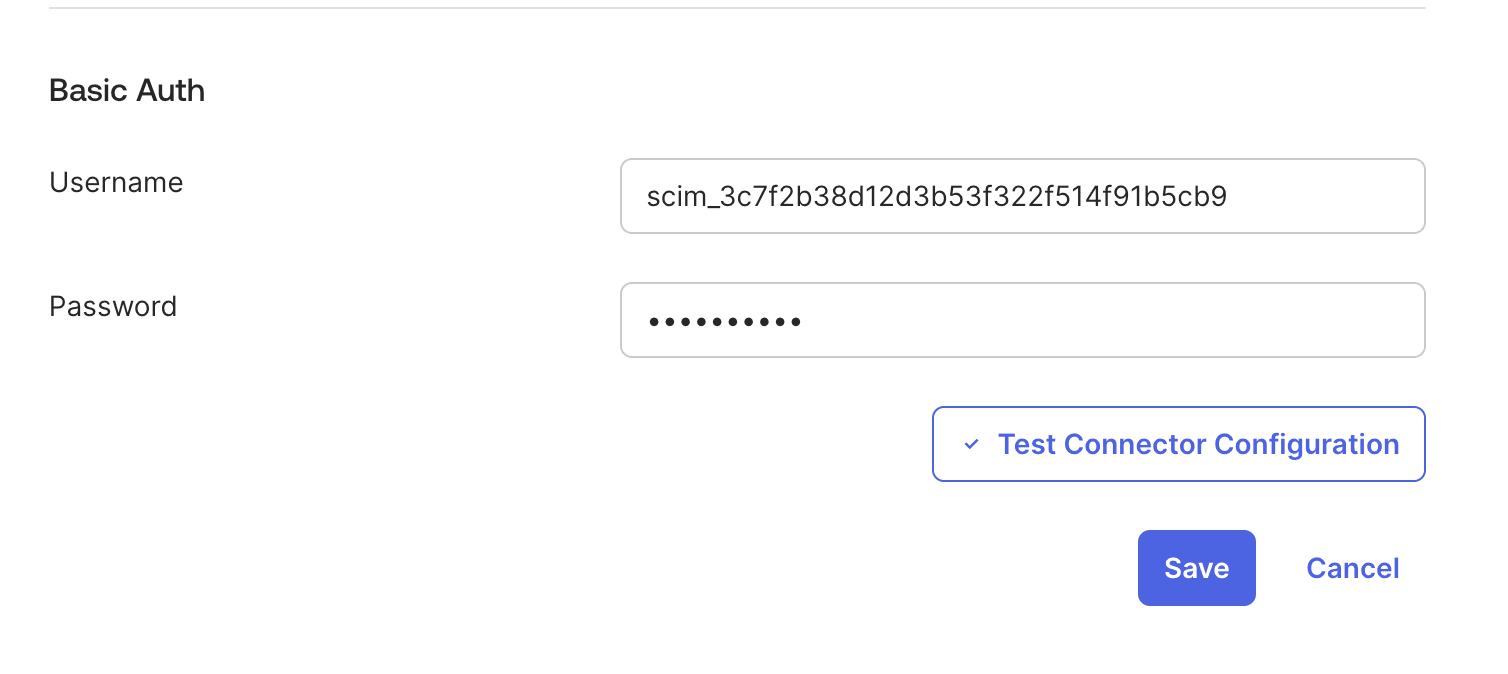
      * **Username** — the SCIM token **key** (it starts with `scim_`).
      * **Password** — the SCIM token **secret**.

            <img src="https://mintcdn.com/private-7c7dfe99-mintlify-fbfa8bee/YtLHbpLqKXQpx3d8/images/cloud/security/scim-okta/scim-okta-06.png?fit=max&auto=format&n=YtLHbpLqKXQpx3d8&q=85&s=d2c1e84b6e37a17ed7e0b145f0c82c04" alt="Enter SCIM connector URL and set the unique identifier to userName" width="1536" height="926" data-path="images/cloud/security/scim-okta/scim-okta-06.png" />

            <img src="https://mintcdn.com/private-7c7dfe99-mintlify-fbfa8bee/YtLHbpLqKXQpx3d8/images/cloud/security/scim-okta/scim-okta-08.png?fit=max&auto=format&n=YtLHbpLqKXQpx3d8&q=85&s=77efe23e3aa3293f3bd8ae395e4850f2" alt="Enter the API credentials for SCIM authentication" width="1508" height="674" data-path="images/cloud/security/scim-okta/scim-okta-08.png" />

    Click `Test Connector Configuration`. You should see a green confirmation. If it fails, jump to [Troubleshooting](#troubleshooting).
    <img src="https://mintcdn.com/private-7c7dfe99-mintlify-fbfa8bee/YtLHbpLqKXQpx3d8/images/cloud/security/scim-okta/scim-okta-09.png?fit=max&auto=format&n=YtLHbpLqKXQpx3d8&q=85&s=813b95ec74dcb869efa5ec3ea5310ae7" alt="Test the SCIM connection" width="1754" height="1520" data-path="images/cloud/security/scim-okta/scim-okta-09.png" />

    Click `Save`.
  </Step>

  <Step>
    <h3 id="configure-provisioning-behavior">
      Configure provisioning behavior
    </h3>

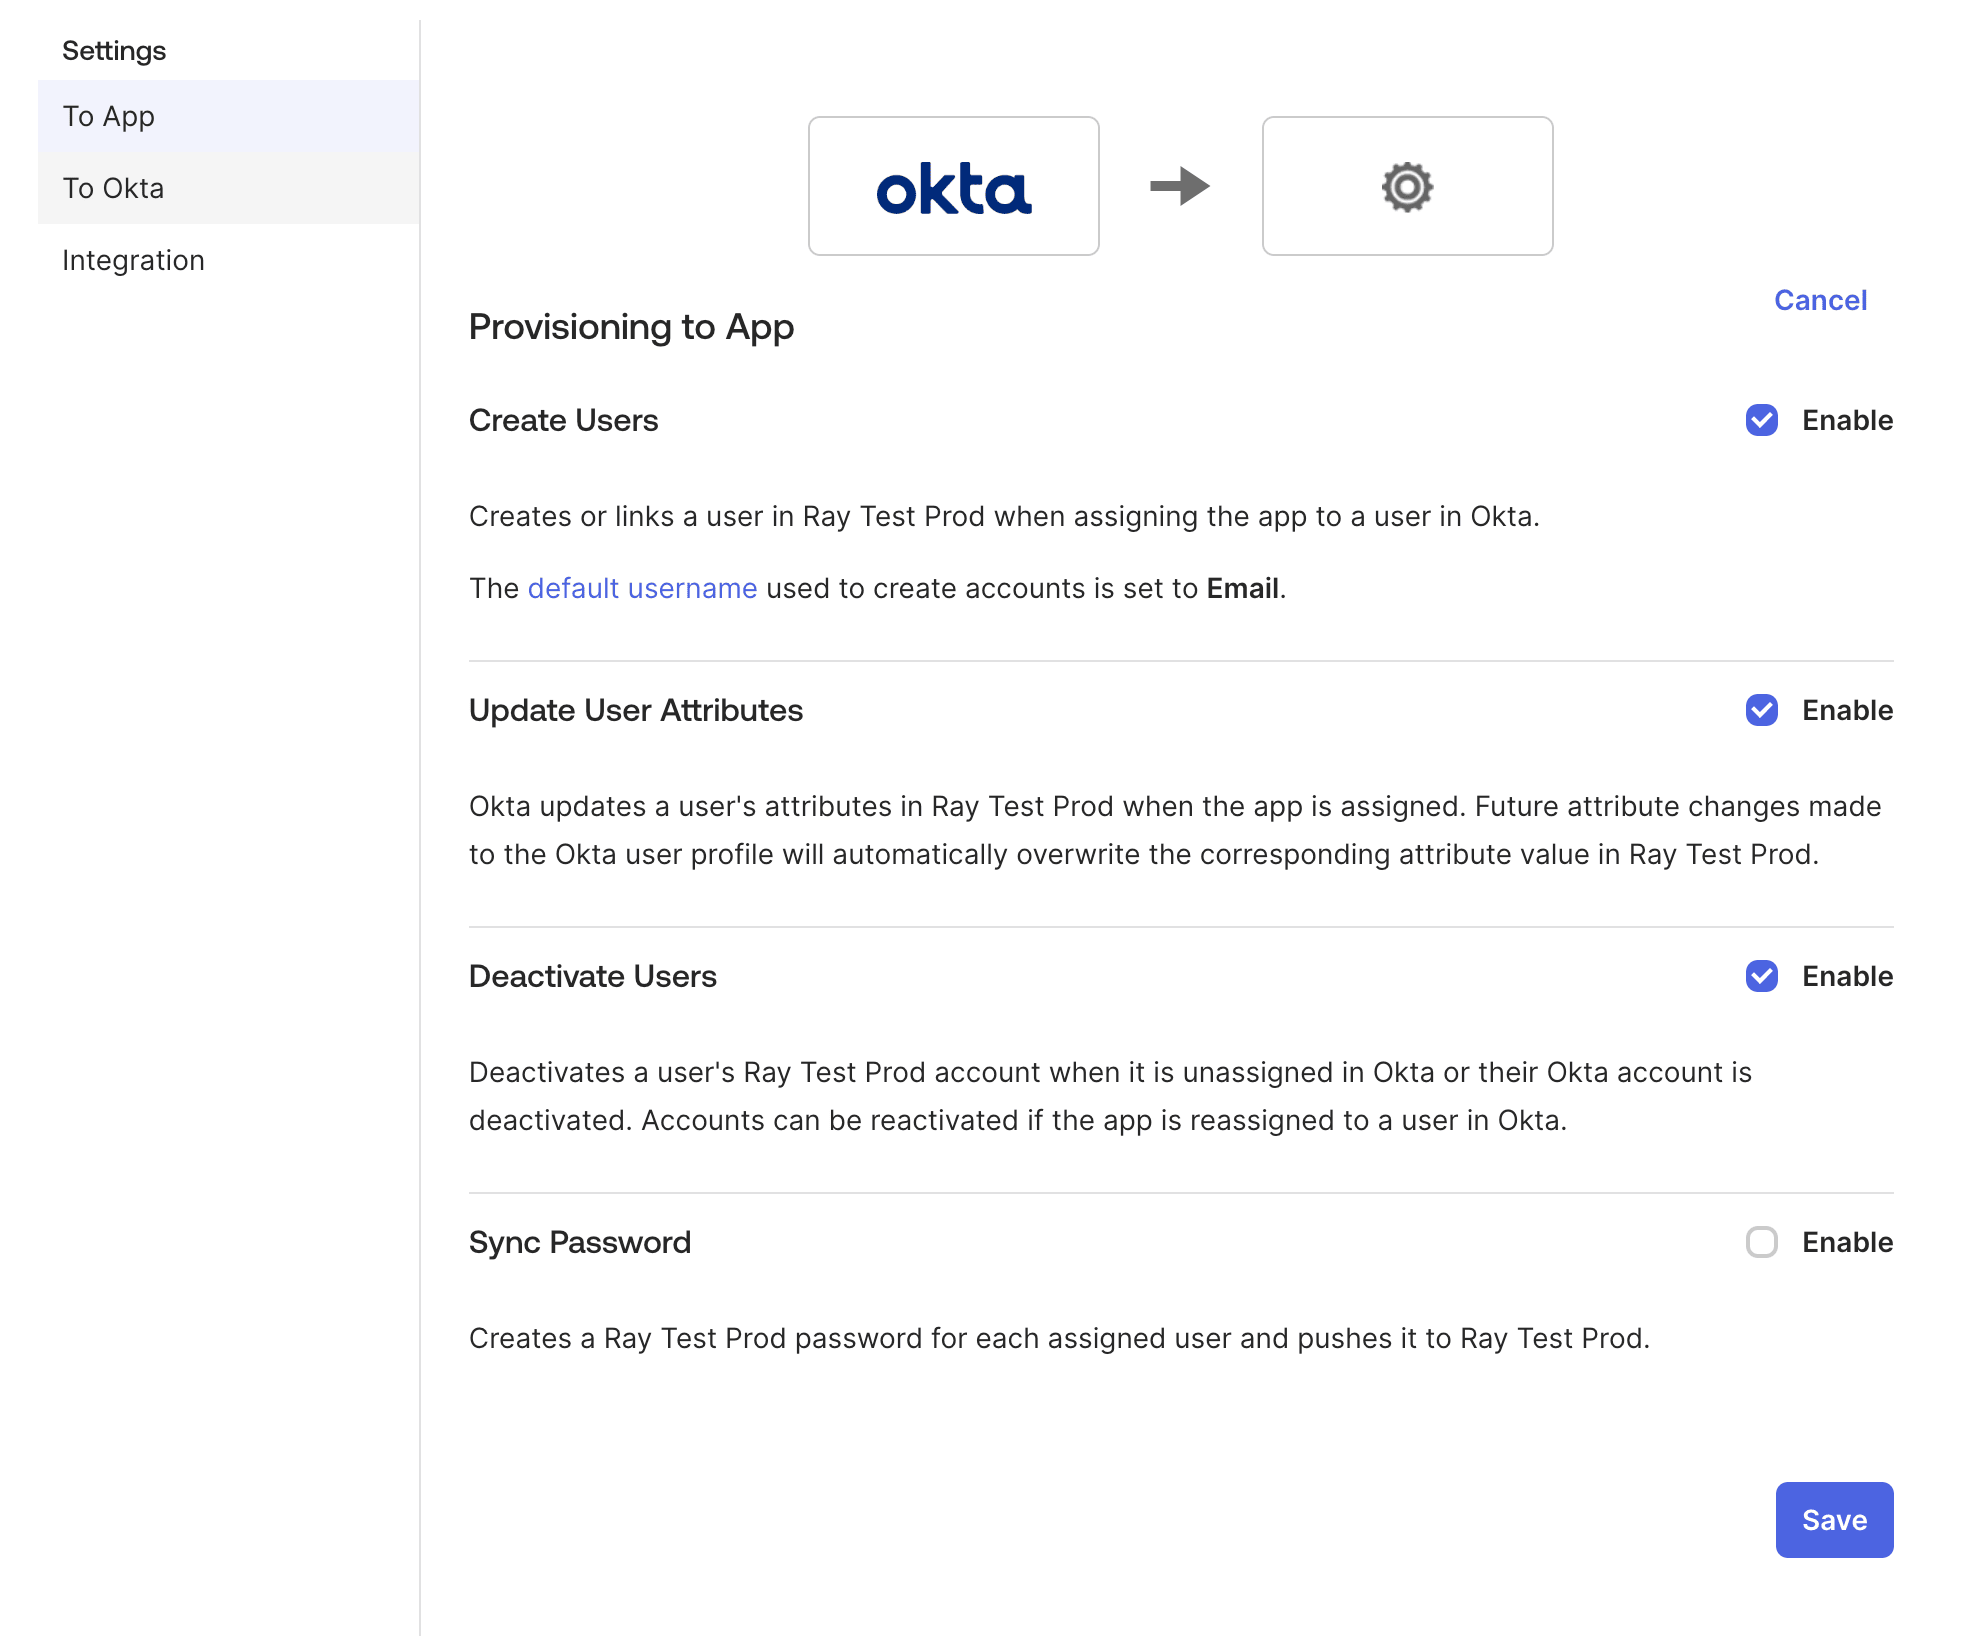
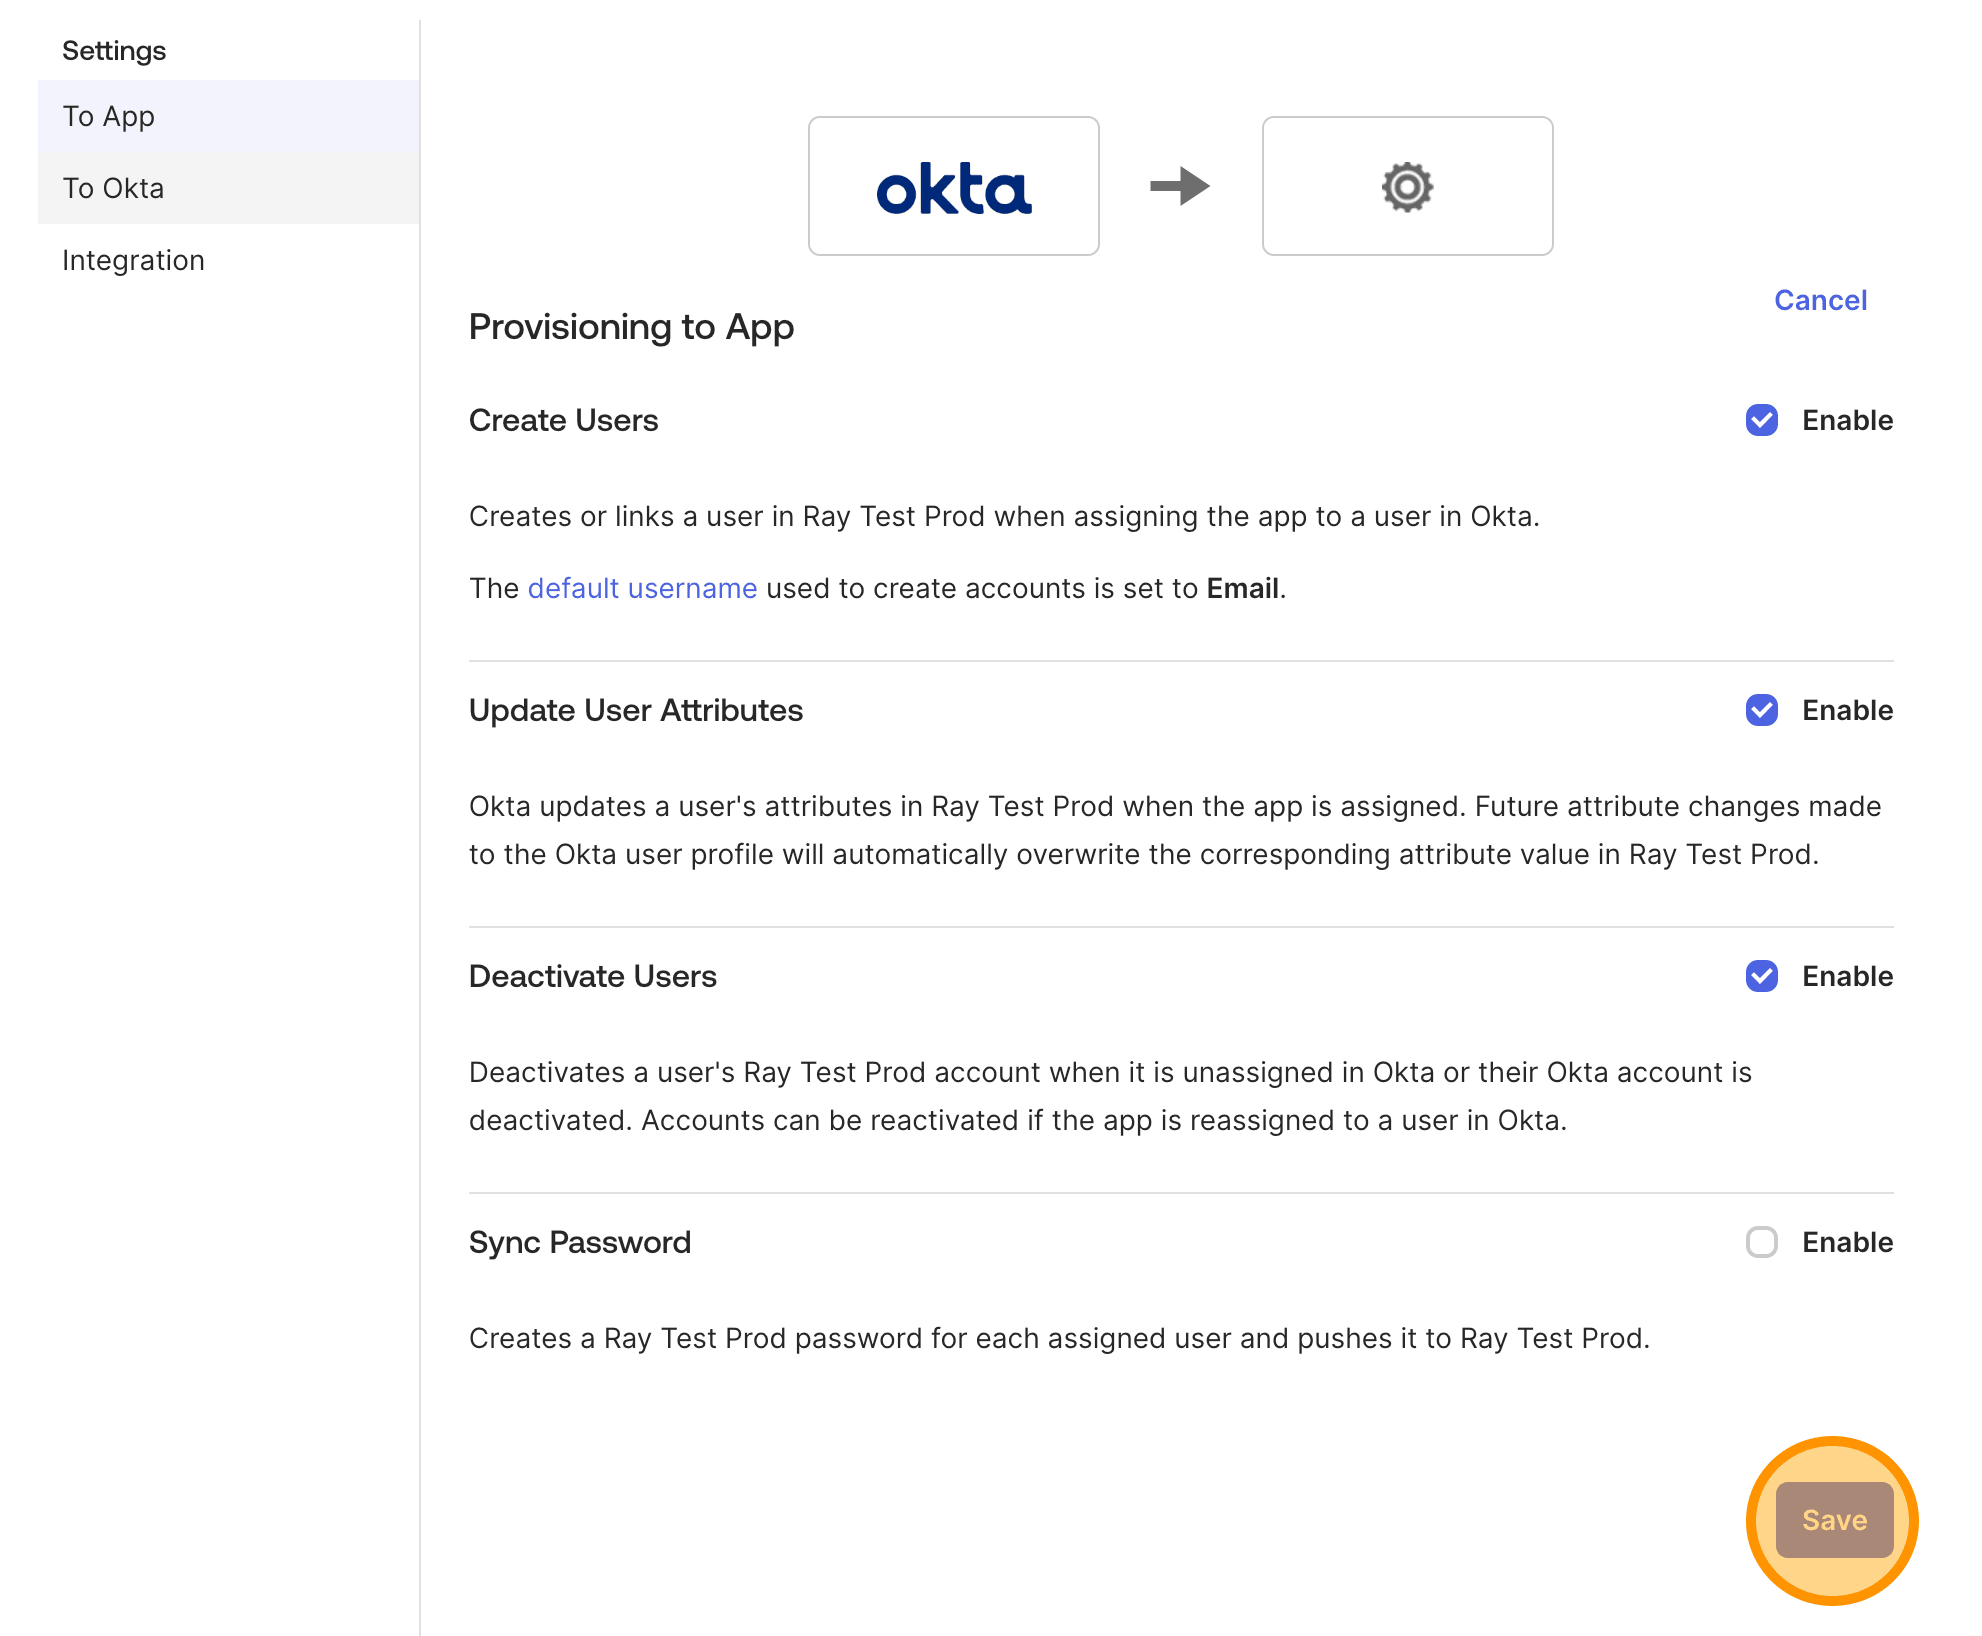
    Still on the **Provisioning** tab, click `To App` in the left sidebar. Click `Edit` and enable:

    | Setting                | Action  | What it does                                                                |
    | ---------------------- | ------- | --------------------------------------------------------------------------- |
    | Create Users           | Enable  | Creates new users in ClickHouse Cloud when assigned in Okta                 |
    | Update User Attributes | Enable  | Pushes profile changes (name, email, etc.) automatically                    |
    | Deactivate Users       | Enable  | Removes a user from ClickHouse Cloud when unassigned or deactivated in Okta |
    | Sync Password          | Disable | Not used — sign-in goes through SAML, not passwords                         |

    <img src="https://mintcdn.com/private-7c7dfe99-mintlify-fbfa8bee/YtLHbpLqKXQpx3d8/images/cloud/security/scim-okta/scim-okta-10.png?fit=max&auto=format&n=YtLHbpLqKXQpx3d8&q=85&s=6bb0e0f12adc91be0861e02af9756cae" alt="Enable SCIM provisioning actions for users" width="1982" height="1636" data-path="images/cloud/security/scim-okta/scim-okta-10.png" />

    Click `Save`, then return to the application's **Sign On** / **Provisioning** tabs to confirm the settings are in place.
    <img src="https://mintcdn.com/private-7c7dfe99-mintlify-fbfa8bee/YtLHbpLqKXQpx3d8/images/cloud/security/scim-okta/scim-okta-10b.png?fit=max&auto=format&n=YtLHbpLqKXQpx3d8&q=85&s=bae38c05eb6a4121adb6c0d4488918e3" alt="Save the provisioning settings and return to the Sign On tab" width="1982" height="1636" data-path="images/cloud/security/scim-okta/scim-okta-10b.png" />
  </Step>

  <Step>
    <h3 id="map-user-attributes">
      Map user attributes
    </h3>

    Okta and ClickHouse Cloud need to agree on how user fields line up. On the **Provisioning** tab, click `To App` and review the **Attribute Mappings** for your application. The defaults from the Okta SAML application are usually fine — verify the table below:

    | Okta attribute    | ClickHouse Cloud (SCIM) attribute | Required                                                  |
    | ----------------- | --------------------------------- | --------------------------------------------------------- |
    | `userName`        | `userName`                        | **Yes** — used as the unique identifier and primary email |
    | `email` (primary) | `emails[primary].value`           | **Yes** — must match `userName`                           |
    | `firstName`       | `name.givenName`                  | Recommended                                               |
    | `lastName`        | `name.familyName`                 | Recommended                                               |
    | `displayName`     | `displayName`                     | Recommended — shown in the ClickHouse Cloud UI            |
    | `externalId`      | `externalId`                      | Recommended — improves accuracy when reconciling          |

    You can add optional attributes such as department, manager, and location — ClickHouse Cloud stores them on the user profile but doesn't use them for permissions today. Anything outside the SCIM standard set is ignored on the ClickHouse Cloud side.

    <Warning>
      **Email casing matters**

      Make sure your Okta `userName` and `email` use the same casing. ClickHouse Cloud normalises emails to lowercase; mismatches between the two fields can cause test failures.
    </Warning>
  </Step>

  <Step>
    <h3 id="push-groups-and-assign-users">
      Push groups and assign users
    </h3>

    This is where roles get applied automatically.

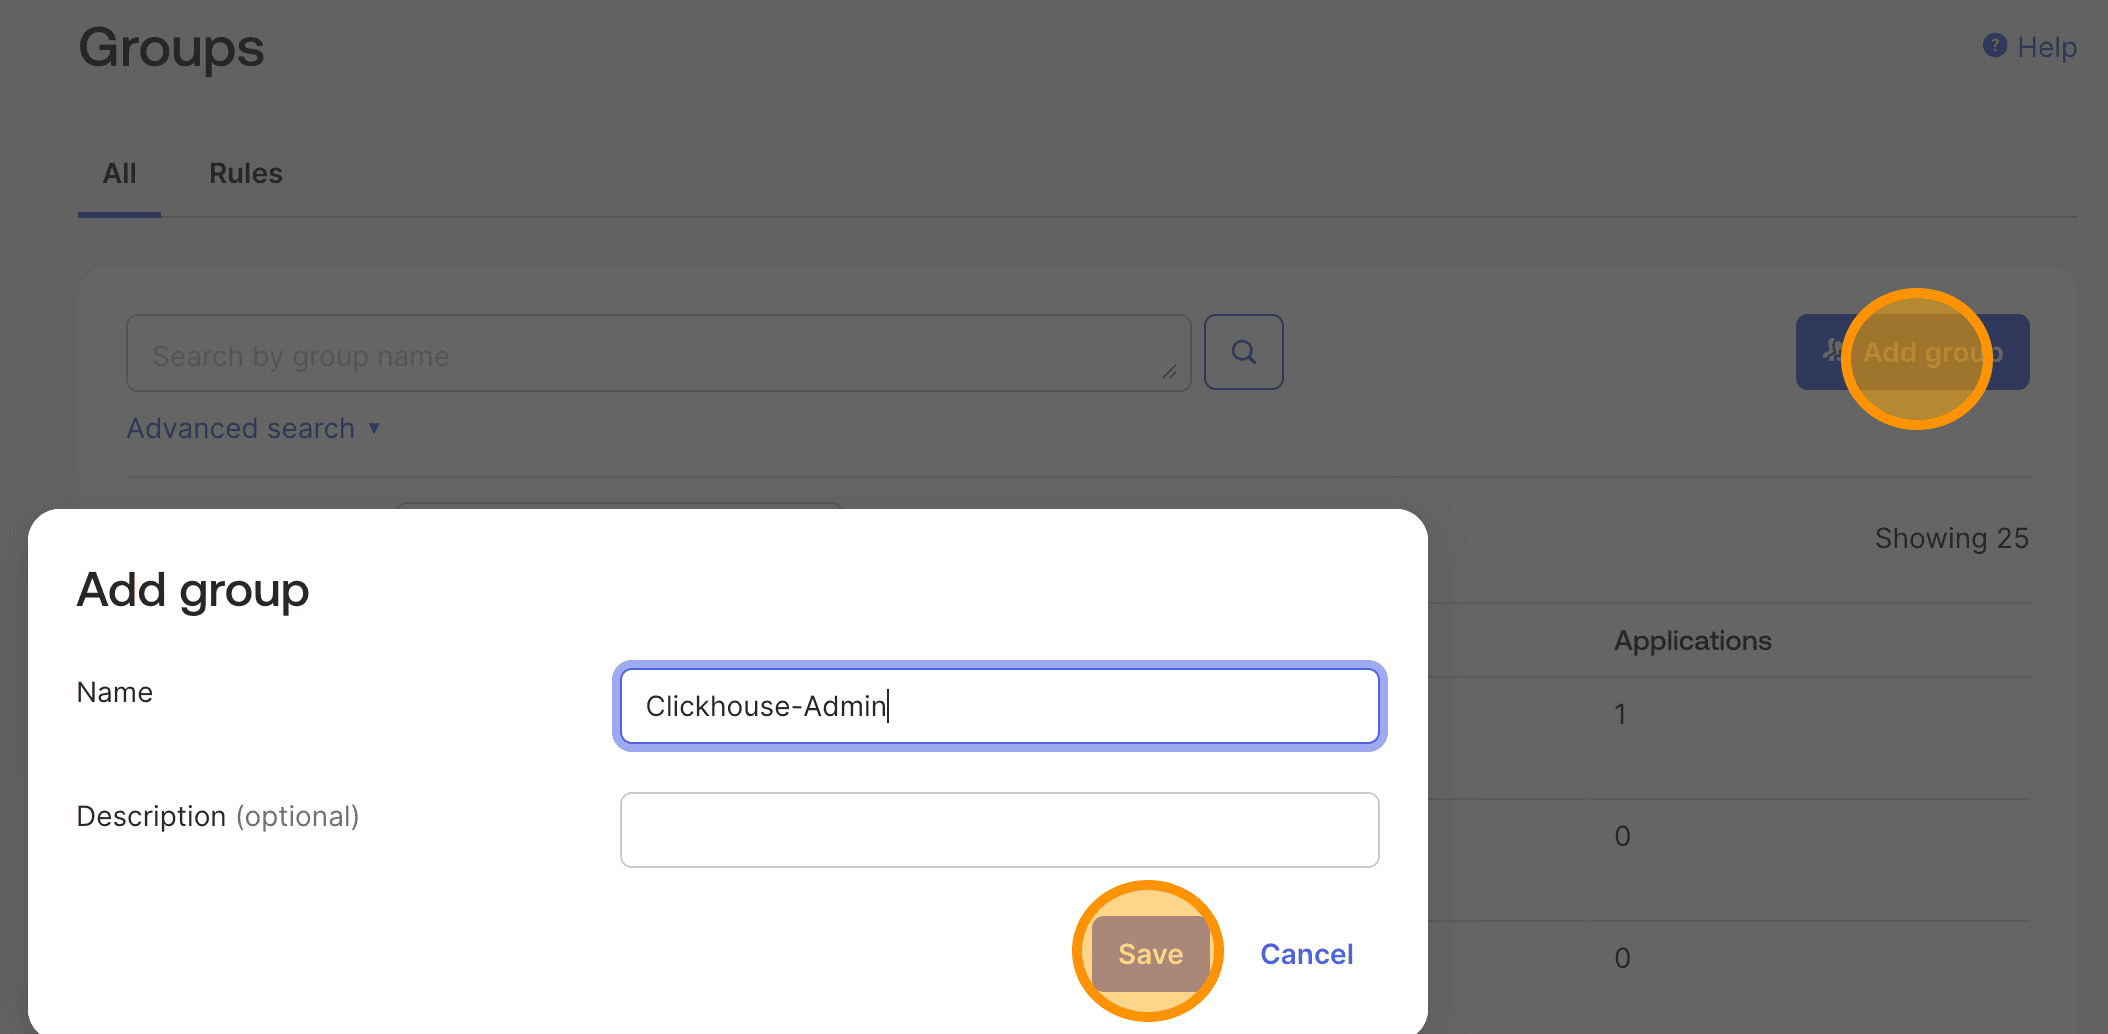
    **Create groups in Okta.** For each role mapping you set up earlier, create or identify an Okta group with the **exact same display name**. For example, if your mapping says `ClickHouse-Admins → Admin`, create a group called `ClickHouse-Admins` in Okta.

    <img src="https://mintcdn.com/private-7c7dfe99-mintlify-fbfa8bee/YtLHbpLqKXQpx3d8/images/cloud/security/scim-okta/scim-okta-13.png?fit=max&auto=format&n=YtLHbpLqKXQpx3d8&q=85&s=9bd0edfe1fbb7ca2b93d286f4bd50a41" alt="Create a new group in Okta" width="2108" height="1034" data-path="images/cloud/security/scim-okta/scim-okta-13.png" />

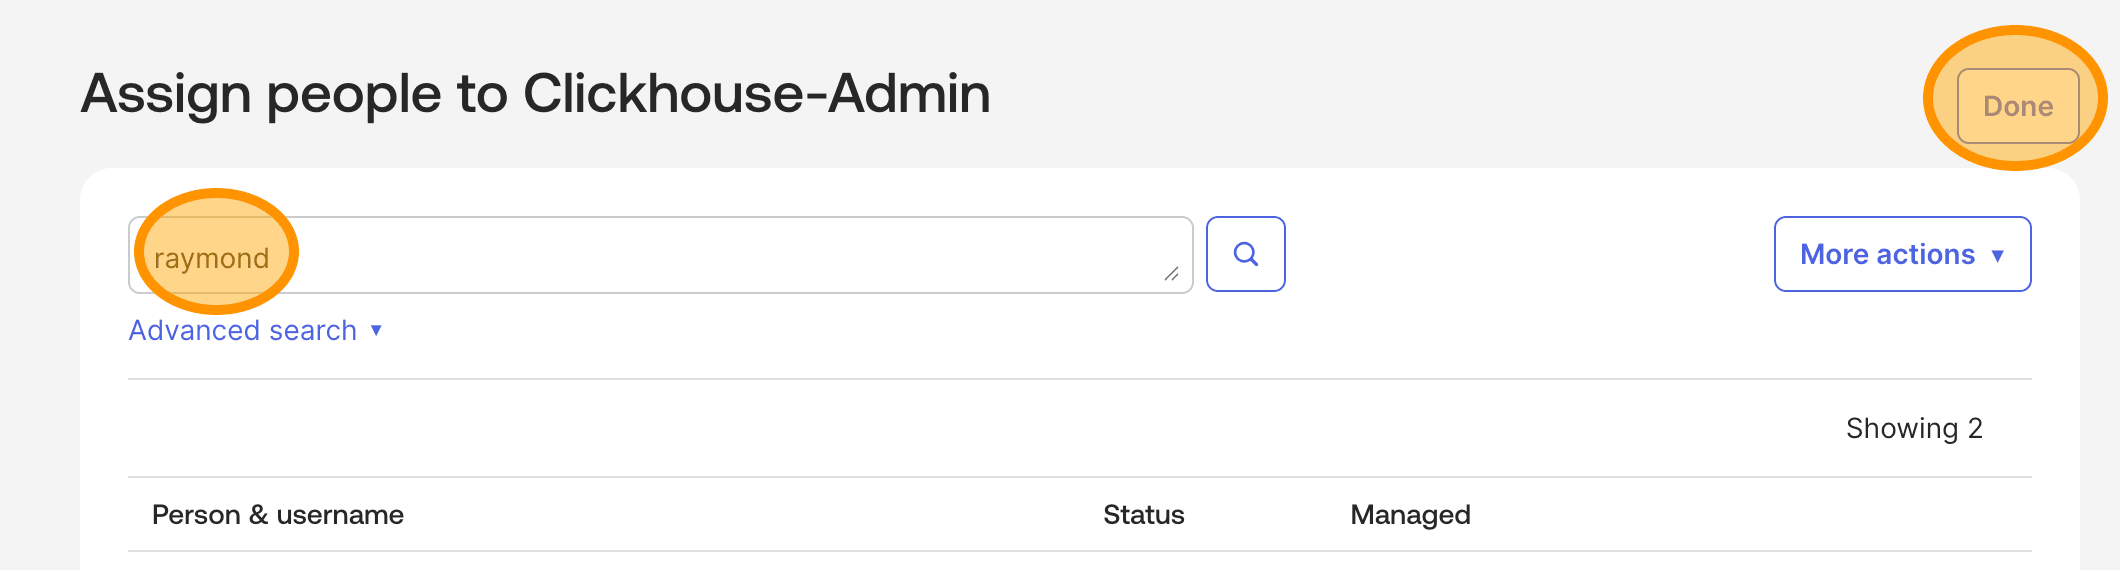
    Open the group you just created and click `Assign people` to add a member to it.
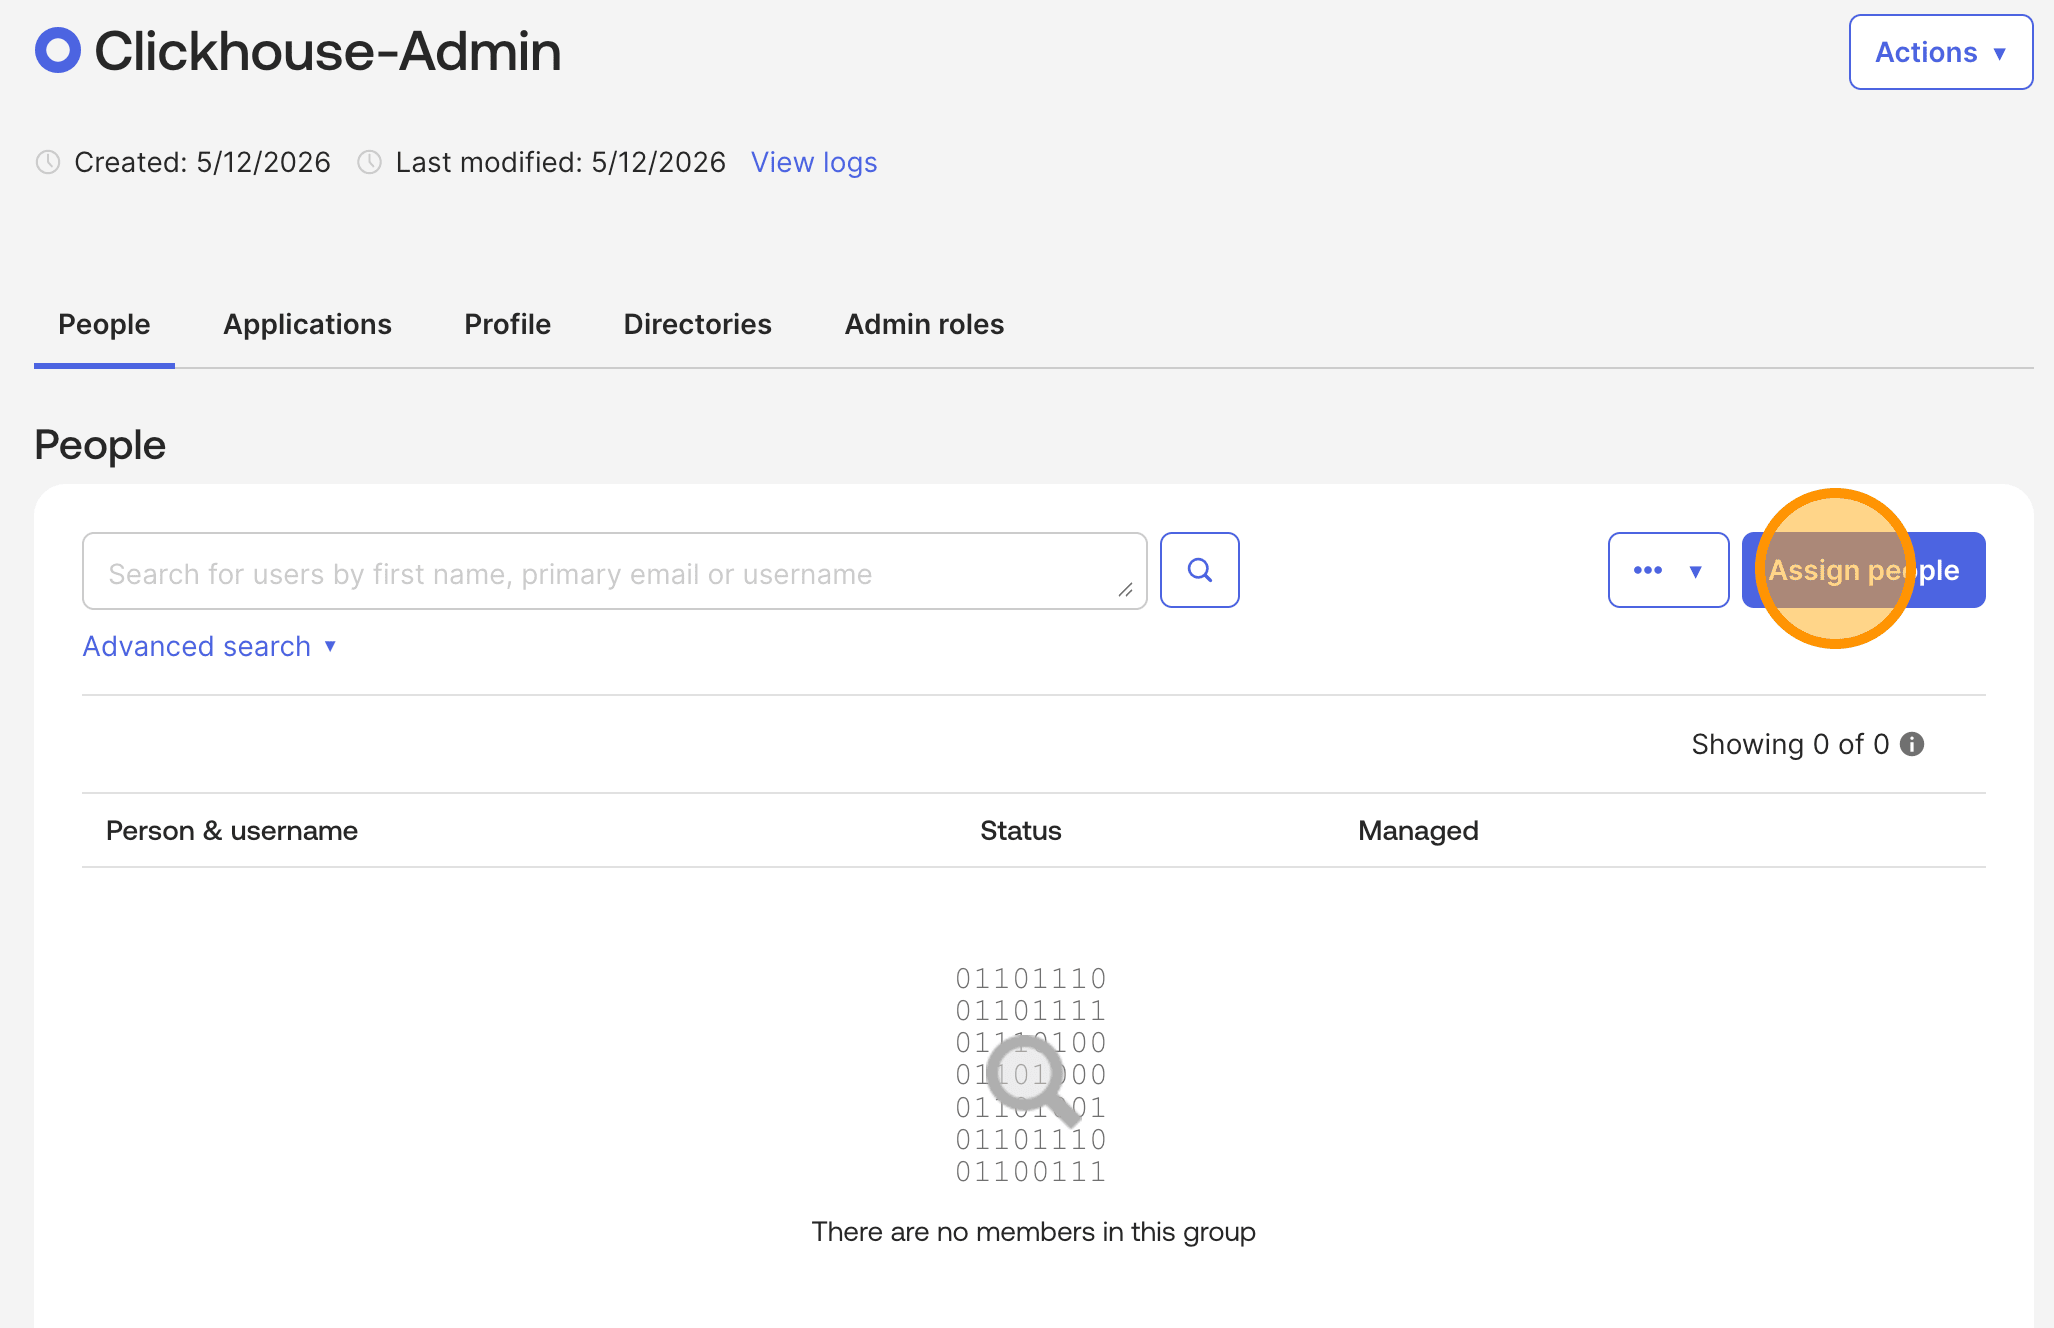
    <img src="https://mintcdn.com/private-7c7dfe99-mintlify-fbfa8bee/YtLHbpLqKXQpx3d8/images/cloud/security/scim-okta/scim-okta-14.png?fit=max&auto=format&n=YtLHbpLqKXQpx3d8&q=85&s=4d55ba9d631b96205f5808407bee4adc" alt="Click Assign people to the group" width="2054" height="1328" data-path="images/cloud/security/scim-okta/scim-okta-14.png" />

    <img src="https://mintcdn.com/private-7c7dfe99-mintlify-fbfa8bee/YtLHbpLqKXQpx3d8/images/cloud/security/scim-okta/scim-okta-15.png?fit=max&auto=format&n=YtLHbpLqKXQpx3d8&q=85&s=fd11ffab4a34c1d8095df636a95f435f" alt="Assign the user to the group" width="2120" height="570" data-path="images/cloud/security/scim-okta/scim-okta-15.png" />

    Then attach the SCIM application to the same group so role membership and app access stay in sync.
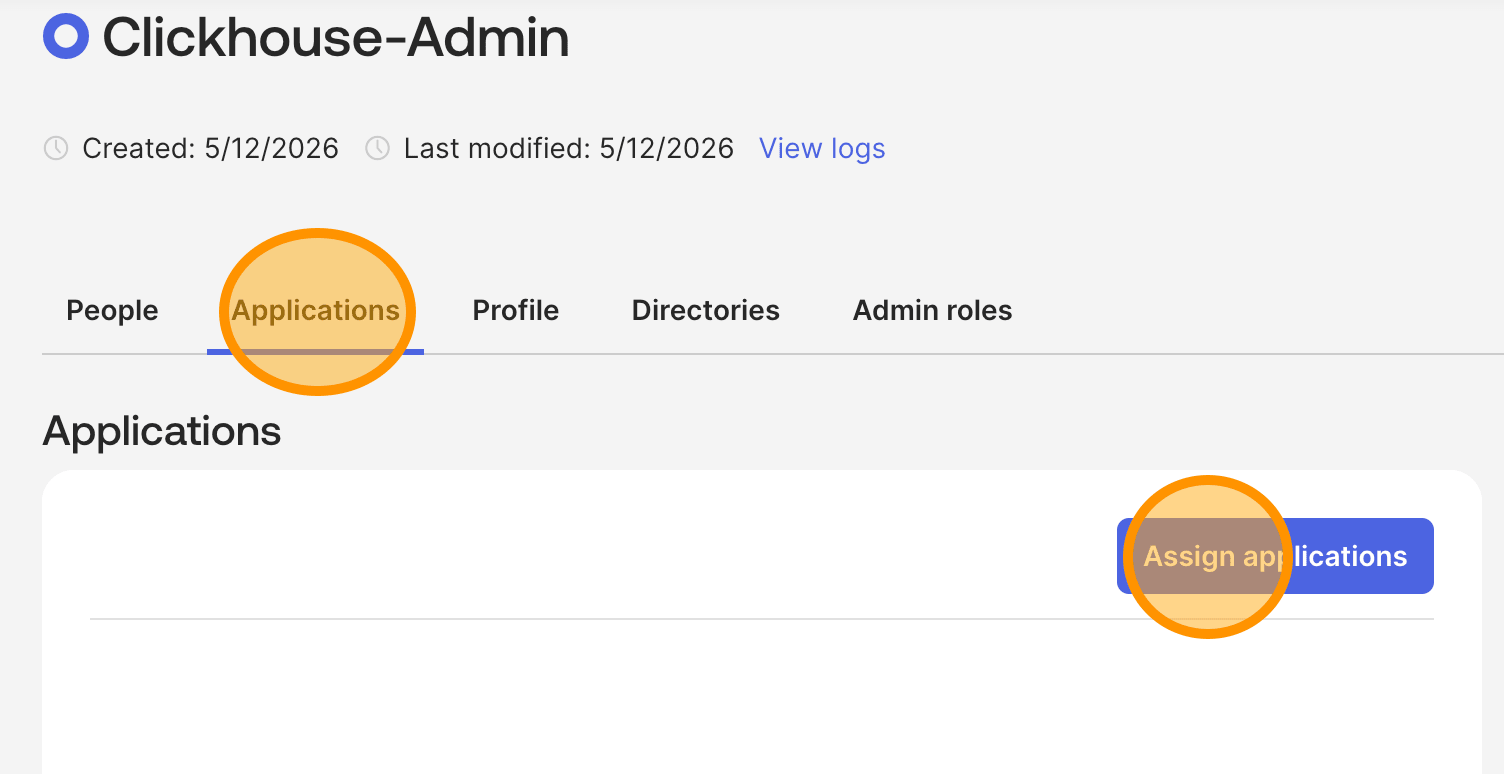
    <img src="https://mintcdn.com/private-7c7dfe99-mintlify-fbfa8bee/YtLHbpLqKXQpx3d8/images/cloud/security/scim-okta/scim-okta-16.png?fit=max&auto=format&n=YtLHbpLqKXQpx3d8&q=85&s=add1b006dd549a55b39a9a19a5332a09" alt="Assign the application to the group" width="1504" height="774" data-path="images/cloud/security/scim-okta/scim-okta-16.png" />

    **Push the groups.** On the application's **Provisioning** tab, click `Push Groups → Find groups by name`, search for your group, and click `Save`. Repeat for each role group. Each one should show a **Push Status** of **Active (Pushed)** once provisioned.
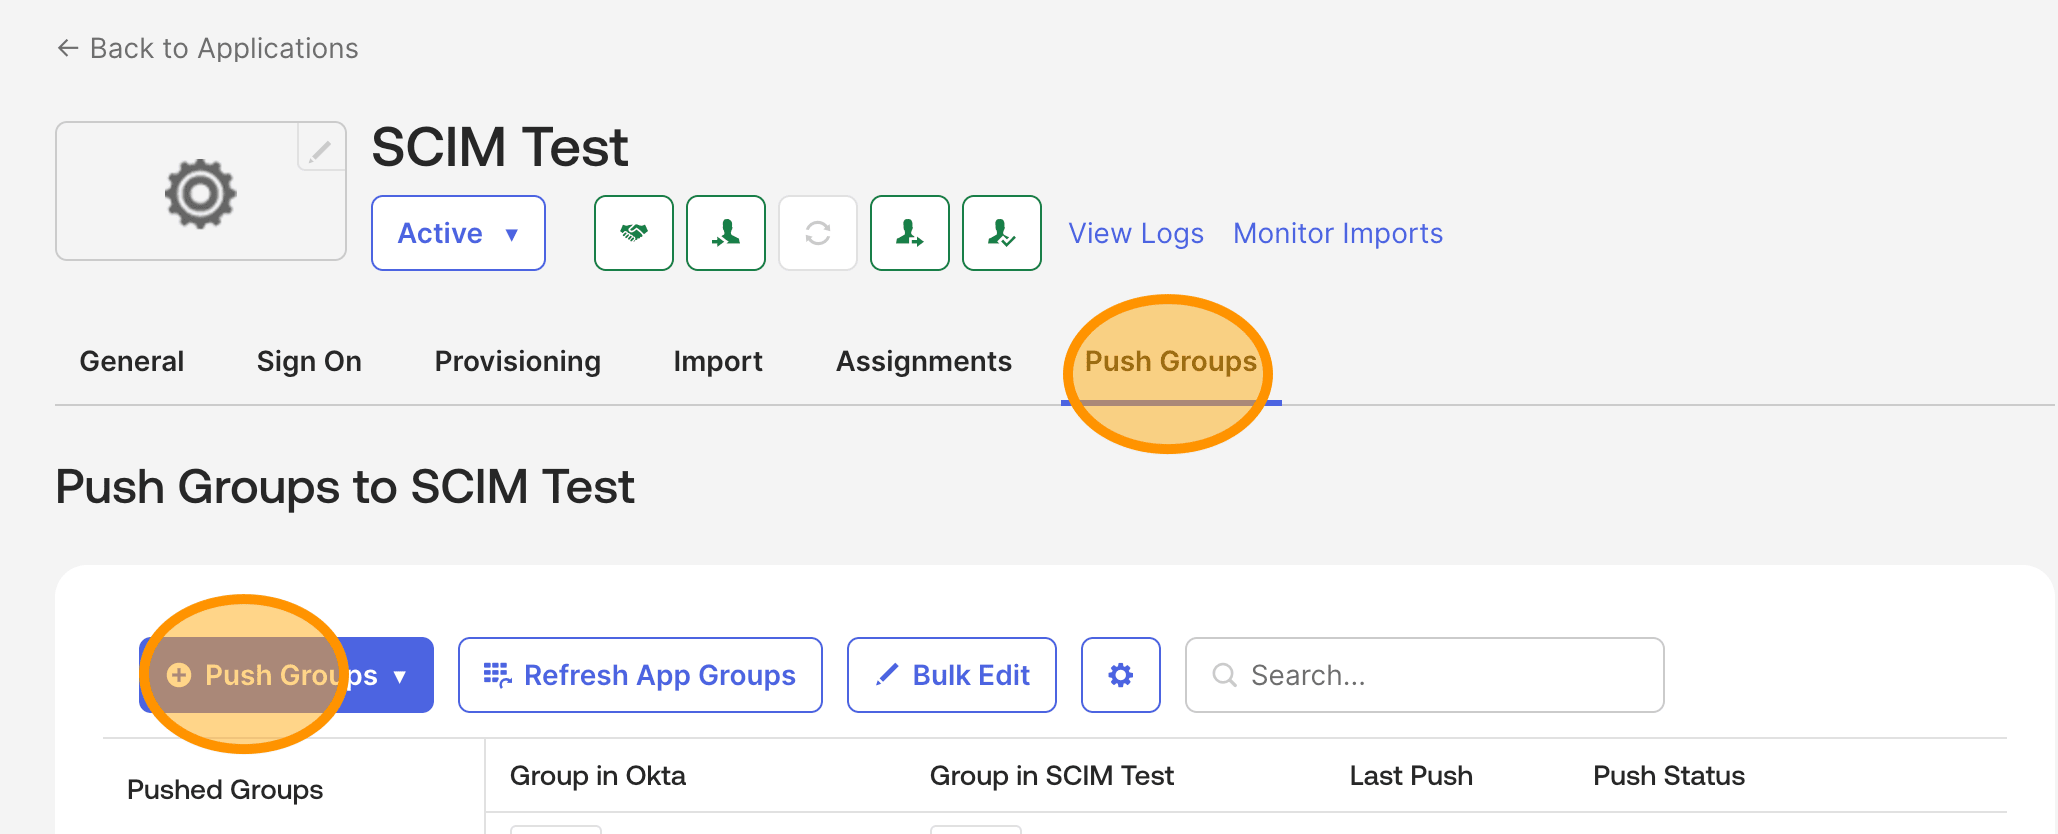
    <img src="https://mintcdn.com/private-7c7dfe99-mintlify-fbfa8bee/YtLHbpLqKXQpx3d8/images/cloud/security/scim-okta/scim-okta-17.png?fit=max&auto=format&n=YtLHbpLqKXQpx3d8&q=85&s=91fcb5a4f84db7da3c8d23d2780557f8" alt="Set up Group Push by name on the application's Push Groups tab" width="2058" height="834" data-path="images/cloud/security/scim-okta/scim-okta-17.png" />

    **Assign users.** You have two options:

    * **Via groups (recommended).** Add users to the Okta groups you just pushed. They'll be provisioned to ClickHouse Cloud and assigned the matching role automatically.
    * **Directly.** On the application's **Assignments** tab, click `Assign → Assign to People` and select individual users. They'll be provisioned with the **Default role** unless they're also in a pushed group.

    Group-based assignment is cleaner for ongoing management — when someone changes role, you only update group membership.
  </Step>
</Steps>

<h2 id="test-the-integration">
  Test the integration
</h2>

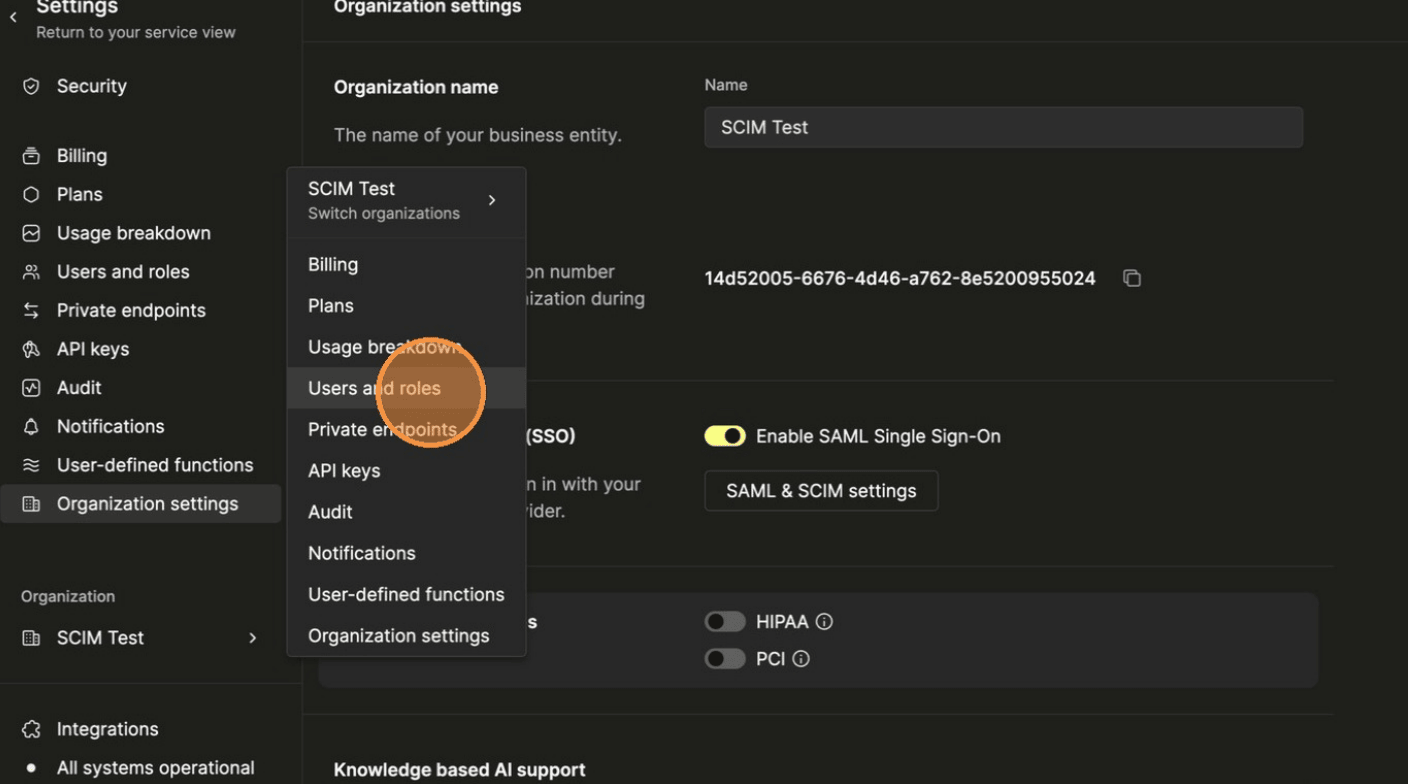
Once provisioning is configured, return to **Settings → Users and roles** in the ClickHouse Cloud Console to confirm that synchronised users have appeared with the expected roles.

<img src="https://mintcdn.com/private-7c7dfe99-mintlify-fbfa8bee/YtLHbpLqKXQpx3d8/images/cloud/security/scim-okta/scim-okta-18.png?fit=max&auto=format&n=YtLHbpLqKXQpx3d8&q=85&s=9758ea63bc9eff89ef47b36b467fc9b3" alt="Verify user synchronization in Users and roles" width="1408" height="784" data-path="images/cloud/security/scim-okta/scim-okta-18.png" />

Run through this short test plan with one or two test users **before** you assign your whole team. Each step should succeed within a few seconds; if it doesn't, check the Okta Tasks queue and the [Troubleshooting](#troubleshooting) section.

| # | Action in Okta                                                   | Expected result in ClickHouse Cloud                                  |
| - | ---------------------------------------------------------------- | -------------------------------------------------------------------- |
| 1 | Add a test user to the `ClickHouse-Admins` Okta group            | User appears in **Settings → Members** with role **Admin**           |
| 2 | The test user signs in to ClickHouse Cloud via SSO               | They land on the dashboard with admin access                         |
| 3 | Update the user's first name in Okta                             | Updated name appears in **Members** within seconds                   |
| 4 | Move the user from `ClickHouse-Admins` to `ClickHouse-Read-only` | Their role changes to **Read-only**                                  |
| 5 | Unassign the user from the application (or deactivate in Okta)   | User is removed from the organization; further sign-in attempts fail |

If any step fails, fix the underlying issue before continuing — symptoms usually compound.

<Tip>
  **Where to look for SCIM errors in Okta**

  SCIM errors surface in **Reports → System Log** filtered by your application, and on the application's **Provisioning → View Logs** screen. The error message returned by ClickHouse Cloud is shown verbatim — start there.
</Tip>

<h2 id="best-practices">
  Best practices for production
</h2>

**Rotate tokens regularly.** Set a calendar reminder for SCIM token rotation. Recommended cadence: every 12 months, or immediately whenever an admin who knew the token leaves the company. ClickHouse Cloud allows two active tokens per organization specifically so you can rotate without breaking provisioning.

**Use groups, not direct assignments.** Direct user assignment to the application works, but quickly becomes hard to audit. Driving assignment through Okta groups means access reviews and role changes happen in one place.

**Review the audit log.** Every SCIM action — user created, user deactivated, profile updated — is recorded in the ClickHouse Cloud audit log. See [Audit logging](/products/cloud/reference/security/audit-logging). Check the log periodically, especially after large provisioning bursts.

**Set a sensible default role.** If an Okta user gets assigned to the application but isn't in any pushed group, they're created with the **Default role**. Pick the most restrictive role that still lets the user accomplish *something*, so misconfigurations fail safely.

**Avoid SCIM and manual invites at the same time.** Once SCIM is on, manage membership through Okta — don't also send manual invites for the same users. Mixing the two paths leads to confusion about who is the source of truth and can produce duplicates.

**Monitor for failed provisioning tasks.** Okta retries failed provisioning calls but eventually parks them in the **Tasks** queue. Add this queue to the dashboards your IT team already monitors, or use Okta's webhook or email alerting to flag persistent failures.

<h2 id="troubleshooting">
  Troubleshooting
</h2>

<h3 id="test-credentials-fails">
  "Test connector configuration" fails in Okta
</h3>

* Confirm SCIM is **enabled** in the ClickHouse Cloud Console.
* Confirm the **base URL** in Okta exactly matches the SCIM endpoint URL shown in the Cloud Console — the organization id must be correct.
* Confirm the **token key and secret** are pasted without leading or trailing whitespace.
* If you've rotated tokens, make sure you're using the **new** key and secret, not the previous pair.

<h3 id="users-no-permissions">
  Users get created but have no permissions
</h3>

* Check that you've added a row under **Map roles in "Users and roles"** for the role you expect.
* Check that the Okta group name **exactly** matches the SCIM group name in the mapping, including capitalisation and hyphens.
* If your design intentionally provisions some users without a group, confirm the **Default role** is set.

<h3 id="duplicate-user">
  Duplicate user in the member list
</h3>

Usually caused by inconsistent email casing between Okta and an earlier manual invite. Remove the duplicate from the Members list, then unassign and reassign the user in Okta to provision fresh.

<h3 id="group-display-name">
  Group push fails with "displayName not recognised"
</h3>

The group name in Okta doesn't match a configured mapping in ClickHouse Cloud. Either rename the Okta group or add a mapping under **Map roles in "Users and roles"** from the SCIM Configuration panel (or via **Users and roles → Roles**).

<h3 id="deactivated-users-remaining">
  Deactivated users still show as members
</h3>

It can take up to a minute for Okta to propagate a deactivation. If the user is still a member after several minutes, check Okta's **Provisioning → View Logs** for an error on the deactivate task.

<h3 id="token-rotation-issue">
  I rotated the SCIM token and now Okta is failing
</h3>

Check that you updated the credentials on **the same SCIM application** in Okta. After updating, click `Test Connector Configuration` to confirm. Once provisioning is back to green, revoke the old token in ClickHouse Cloud Console.

<h3 id="lost-token">
  I lost the SCIM token
</h3>

Tokens can't be recovered. In **Organization settings → SAML and SCIM settings → SCIM Configuration** in the ClickHouse Cloud Console, revoke the lost token and generate a new one, then update the credentials in Okta.

<h2 id="faq">
  Frequently asked questions
</h2>

**Do I need SAML SSO before I can use SCIM?**
Yes. SCIM creates the user accounts, but ClickHouse Cloud authenticates them through SAML. Set up [SAML SSO](/products/cloud/guides/security/cloud-access-management/saml-sso-setup) first.

**Does SCIM work with Microsoft Entra ID, OneLogin, or other SCIM 2.0 IdPs?**
Officially, no — Okta is the only IdP we've tested and support today. The endpoint follows SCIM 2.0 (RFC 7644), but authentication is restricted to Basic Auth, so any IdP that can't authenticate over Basic Auth won't work. Other Basic-Auth-capable SCIM 2.0 IdPs may work in practice, but we make no guarantees.

**How quickly do changes in Okta show up in ClickHouse Cloud?**
Most operations propagate within a few seconds. Bulk changes (large group push) can take longer depending on size, but Okta retries automatically on transient errors.

**Can I provision multiple ClickHouse Cloud organizations from a single Okta tenant?**
Yes — install the application once per organization, with its own SCIM endpoint URL and token. Push the same Okta groups to each application as needed.

**Where do I get help if I'm stuck?**
Open a support ticket from the ClickHouse Cloud Console (**Help → Contact support**) and include:

* your organization id,
* your Okta application id, and
* a screenshot of the failing task or test from the Okta logs.